 Dr. Ronald Steiner
 Kumiko Weber Sakaguchi

The hip joint: a bone-defining ball joint
As a ball joint, the hip joint is able to move in any direction. The joint socket encloses the head of the femur from all sides. The shape of this socket as well as the angle that the femoral head is attached to the thigh determines the maximal range of motion for the hip joint. For this reason, we call the hip joint a bone-defining ball joint.
Each hip joint is unique in the shape of the socket and the connection to the thigh. This means that range of motion is variable and will be different for each person. This is why some yoga poses are very easy for some and extremely challenging for others. A regular yoga practice will help us to develop our natural range of motion.
Like a bicycle wheel?
Discovering and developing your personal range of motion is a good start, but it is not sufficient work to maintain a healthy hip joint. There are different variables such as the impact of force on the joint. We can look at stading as an example. When stading the force vector is coming from above. At first glace it might seem that force is transferred as pressure from the bottom of the socket to the top of the femur head. However, such pressure on a limited area will wear down the cartilage, leading to osteoarthritis.
So that we can prevent our joints from wearing down so quickly, nature has developed a way to convert this pressure into tension. We could think of the spokes of a bike wheel. In the case of a wheel it is not the transmission of pressure between the hub and the rim, but rather the tension of the spokes that distributes the pressure as tension, and when equally tense, tension which is evenly distrubuted across the entire wheel.
This is where fascia come into play: similar to the function of spokes, fascial lines fix the head of the femur in the center of the hip socket. The femoral head floats in the center of the joint socket, similar that of the relationship between the bike hub and rim.
Because we not only stand but move is all possible directions, it is important that our 'spokes' are evenly tensioned from all directions. It is only when the tension is evenly distributed that this natural quality of floating tension can be effective.
An opposing helix
Spokes do not usually span the shortest path from the hub to the rim. Instead, the spokes pull a tangent fashion from the hub to the rim, crossing other spokes that build tension in the opposing tangent. This creates a wheel with a kind of elastic stability from different angles.
Precisely this principle is used in nature to create floating tension from different angles within a joint. The fascial lines are not pulling lineraly over the joint, but diagonally in opposite directions.
When looking at the bigger picture, you can follow these opposing helical lines over the joint through the entire leg and upward into the torso. The tension is actually distributed across the entire body and connects all of its joint making one complete functional unit.
Exercise Sequence
With the followin exercise seuqence, you can activate the floating tension of your hip joint, which is key to maintaining healthy hips and body. To create this floating tension, we activate the helical tension of the opposing helical fascia lines from a variety of different angles.
SUpine leg rotation

Lie comfortably on your back. Stretch your left leg from the hip joint outwards and lift the leg only slightly from the floor.
Maintain this length and height in the leg as you begin to rotate the entire leg from the hip joint inward and outward. You are not circling your foot here, the entire leg moves as one piece (Fig. 1).
Continue the exercise until you can sense a slight fatiguing of the deep hip muscles. Perhaps you can also be more aware of the 'spokes' that allow your femur to float in the hip joint. Then switch legs.
Effect: In lifting the leg from a supine position, you activate the muscles at the front of the hip joint. The rotational traction of the fascia, which stretches diagonally across the hip, helps to activate these features. These are part of the opposing double helix of the pelvis.
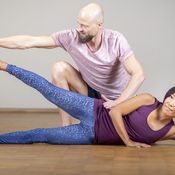
Side-lying leg rotation (upper leg)

Roll onto your side. Support your torso with your hands so that you are stable. Vigorously stretch the uper leg out of the hip joint and lift it up a bit so that it hovers. Again maintain this length and height as you rotate the leg from the hip joint inwards and outwards (Fig. 2).
Keep going until again you can sense fatigueing in the deep hip muscles. Before switching sides, go straight to the next exercise (see below 'Effect'):
Effect: This new orientation activates the outer parts of the hip joint. Again the rotation activates the floating tension of the opposing double helices from this angle.
Side-lying leg rotation - (lower leg)

Directly from the previous exercise, place the upper leg on the floor either behind or in front of the lower leg. This will hel to stabilize you in your side so that you can stretch out and slightly lift the lower leg.
Again draw length from the hip joint through the leg as you begin to rotate the leg inwards and outwards. Maintain as much length as you can (Fig. 3).
Once you again feel the warming sensation of fatigue in the hip, switch your position to side lying on your other side and perform these two exercises (upper and lowe leg rotation) together.
Effect: This exercise will activate the inner lines of tension of the hip joint. This portion of the opposing helix is the one wiht the least amount of tension, so this exercise is a great way to bring more balance. This is important to consider when it comes to therapeutic yoga exercises.
Prone leg rotation

Find your way to a prone position. Lift your left leg slightly from the floor and again stretch it long from the hip joint. Again you will begin rotating the leg from the hip joint inwards and outwards. Drawing length from the hip joint is a key action to remember here (Fig 4).
Continue until you feel fatigue in the deep muscles of the back of the hip joint. Then repeat the exercise on the right leg.
Effect: The opposing helical fascia at the back of the hip joint completes the harmonious floating tension of the femoral head in the hip socket. In this last exercise of the series, you have succesfully activated the tension of the fascia across the entire hip joint. By centering the femur head in such a way, your entire limb will seem to be in a suspended state.
Have fun practicing!
Many thanks to Paul Königer for the photos.
Many thanks to OGNX for the apparel.

-

Joe Christian Wein
at 11.12.2023Wenn ich diese Übungen in der Ashtangayogapraxis einbauen will, wo soll ich die unterbringen? Wenn ich diese Übungen in der Ashtangayogapraxis einbauen will, wo soll ich die unterbringen?
-

Hallo Joe,
ich empfehle therapeutische Übungen VOR die Sonnengrüße zu legen. - Also bevor Du in den Ujjayi Atem und die vom Atem getragene bewegte Meditation eintauchst.
Viel Freude beim Üben [...] Hallo Joe,
ich empfehle therapeutische Übungen VOR die Sonnengrüße zu legen. - Also bevor Du in den Ujjayi Atem und die vom Atem getragene bewegte Meditation eintauchst.
Viel Freude beim Üben wünsche ich Dir
Ronald
-
-

Gisela Göbel-Willenbacher
at 27.03.2023 -

Einfache, aber doch so wirkungsvolle Übungen - die auch den TN so gut weiterzugeben sind - absolut perfekt! vlG Cee Einfache, aber doch so wirkungsvolle Übungen - die auch den TN so gut weiterzugeben sind - absolut perfekt! vlG Cee
-
Viel Freude Deinen Schülern! Viel Freude Deinen Schülern!
-
-
Elke Donner
at 25.02.2020Danke, wunderbare Übungen :) - Wird das Bein in den ersten drei Übungen wechselnd von innen nach außen rotiert und in der 4. Übung nur von innen nach außen?
Namaste
Elke Danke, wunderbare Übungen :) - Wird das Bein in den ersten drei Übungen wechselnd von innen nach außen rotiert und in der 4. Übung nur von innen nach außen?
Namaste
Elke-
Hallo Elke,
wau. Vielen Dank.
Das Rotieren des Beines aus dem Hüftgelenk ist in allen vier Übungen gleich. Also in beide Richtungen. Lediglich die Körperlage ändert sich.
Namaste und herzliche [...] Hallo Elke,
wau. Vielen Dank.
Das Rotieren des Beines aus dem Hüftgelenk ist in allen vier Übungen gleich. Also in beide Richtungen. Lediglich die Körperlage ändert sich.
Namaste und herzliche Grüße
Ronald
-
Messages and ratings