 Dr. Ronald Steiner
 Melanie Pilz


 Dr. Ronald Steiner
& more
Dr. Ronald Steiner
& more
The joint with the greatest ROM
As a ball and socket joint, the shoulder joint has an impressive range of motion in comparison to those of the hand, elbow, knee or ankle. Added to this is the mobility of the shoulder blade, which can slide and rotate freely across the upper body in all directions. The shoulder blade and joint together is without question the most flexible joint in the human body.
Because of this extensive range of motion (ROM), the shoulder joint is also quite susceptible to overloading and a variety of injuries. The main reason for this is that pressure or force against the joint can occur at any given angle because if its' flexibility, and this increases the chances of injury.
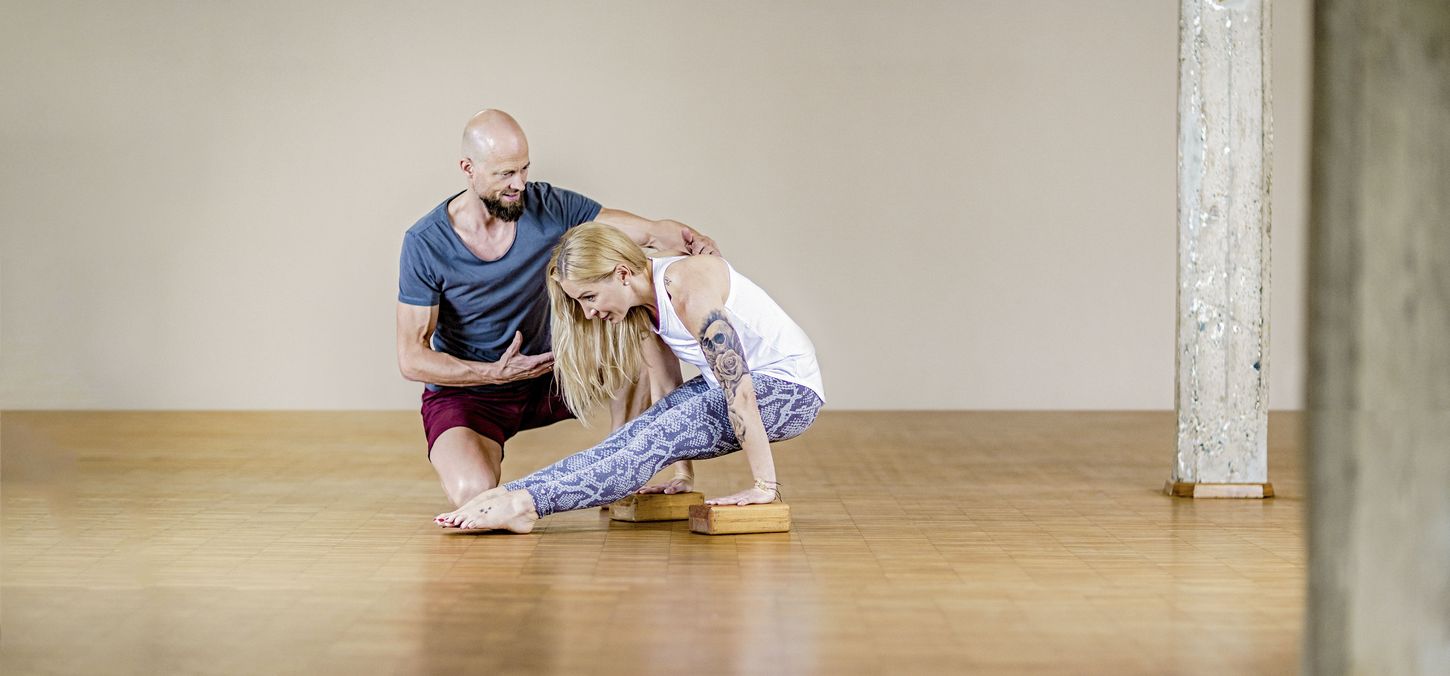
The shoulder is a key element to acrobatic elements in yoga
Your shoulders are especially loaded when you are practicing acrobatic postures. Handstand, jumping back and jumping forward are just a few examples of how intensely your shoulders are working to carry your body weight in your regular practice.
While it may seem overwhelming, the shoulder is actually well-prepared for this type of strain. In order to absorb and distribute force, an ingenious system of multi-layered, helically interwoven fascial lines wrap around the shoulder. If these lines are holding a balanced floating tension, they push the length of the arm long in the direction of the pressure. This in turn relieves undue pressure on the joint surfaces.


The shoulder blade floats
You can see the floating effect most clearly on the shoulder blade and collarbone. The entire arm is connected to the trunk by the filigree shoulder blade. The connection itself defines range of motion of the shoulder blade and less used for power transmission.
When we put weight on the arms, the fascia connected with our muscles pulls the shoulder blade against the direction of the load. The range of motion is limited by the radius of the clavicle. In this way, the shoulder blade moves with its articular surface in the direction in which the arm is pointing.
The pressure on the arm is absorbed by the fascia of the muscles in the shoulder. Ideally there would be hardly any strain on the delicate joints between the collarbone and the shoulder blade. When the muscular fascia of the shoulder is activated, the shoulder floats above the ribs on the torso.
The upper arm is centered under the acromion
The same principle applies in the connection between the shoulder blade and the upper arm. The head of the humerus has a relatively large diameter. The joint surface of the shoulder blade is relatively small. It is covered by the acromion from above and this offers protection from external impact.
Just as the shoulder blade floats on the upper back, the head of the upper arm is tensed in the center of the joint socket of the shoulder blade. The force vector spans, in part diagonally, across the joint. In this way, the joint is not pulled into the socket, but is held in a floating tension over the socket.
From a wider view, the diagonal force vectors are part of opposing helical lines of fascia. They span across the shoulder joint and create a functional unit with the arm.
Exercise sequence
With this exercise sequence you can activate the opposing helical fascia lines across the shoulder joint and promote an even floating tension. The different exercises will be carried out from different angles which will promote this same floating tension, regardless of the angle at which the load comes.
Shoulder joint rotation on all fours
Start on all fours. Your hands should be placed vertically under the shoulders and your knees under the hips. Stretch your arms long.

Now rotate the humerus in the shoulder joint inwards and outwards. The hands move as a result of the upper arm rotating inwards and outwards. (Fig. 1 and 2).

Continue in this fashion until you feel a slight fatigue in the muscles spanning across the shoulder joint.
Option: The more weight you place on the hands, the more challenging this exercises will be. If you wish to start more gently, move your hips further back so that your body weight is distributed more toward the legs.
Effect: This exercise activates the muscles that diagonally connect the upper arm to the shoulder blade. These are part of the opposing helix of the arm. The head of the humerus is suspended in the center of the joint socket. The arm is at 90 degrees from the body. This is the same angel that you have in plant pose or at the top of a push up. This exercise is the ideal preparation for these demanding exercises.
Shoulder blade rotation in plank
From the previous exercise, place your hands on the ground so that the index fingers forward or a bit outwards. Stretch one leg at a time out until you are in a nice and stable plank pose. There will be a nice declining line spanning along the body from the shoulder girdle to the heels.

Inhale and push the arms into the ground. Your back remains straight, meaning be careful not to round too much (Fig. 3).

Exhale and let the vertebrae sink down between your shoulder blades. Keep your torso stable and do not bend the elbows. The movement occurs at the shoulder blades here (Fig. 4).
Repeat the exercise a few times until your body gets familiar with the movement. If you are feeling comfortable with the sinking and hovering, you can try to create circles with the shoulder blades. When you exhale you sink and move the shoulder blades away downwards away from the ears. When you inhale you lift and hover, moving the shoulder blades toward the ears.
At first you will feel the fatigue in the shoulders after just a few repetitions. Over time this will take longer and you can challenge yourself further.
Option: You can start with a more gentle version by lowering the knees to the ground. Or, you can challenge yourself further by raising your feet higher, let's say, on top of two yoga blocks.
Effect: While the previous exercise was focusing on the shoulder joint specifically, this exercises targets the opposing helical fascial that stabilizes the shoulder blade in a hovering state over the torso. The shoulder blades are suspended over the ribs. This floating tension can be carried along into even more challenging postures.
Prone shoulder joint rotation
Now lie down prone on the floor. Extend the arms above your head. Actively push the shoulder blades as well. Push above your head as of you wanted to reach the wall in front of you with both hands. Making fists with both hands can help the exercise to be even more effective. Leave your forehead on the floor and stretch longer and longer as you go. The arms hover long above the floor.

Now start to rotate the arms in the shoulder joint inwards and outwards (Fig. 5 and 6). The movement should come from the rotation of the humerus in the shoulder joint, not the forearms and definitely not the hands. This will quickly become challenging as you start to activate the deep muscles and the associated fascial lines of the rotator cuff (the muscles between the shoulder blade and the upper arm).

Caution: This is a very challenging exercise for the rotator cuff at this angle. Only try this if you know your shoulders are healthy. This is an exercise for those who practice demanding acrobatic postures who want to prevent injury.
Effect: The tension of the rotator cuff in the overhead position is essential to be able to practice poses such as downward dog, forearm stand, or handstand in a healthy way.
Shoulder blade rotation in downward dog
Come into downward facing dog. A good starting point is from child's pose with arms stretched overhead and the hands slightly close than shoulder width apart. The fingertips can point outwards slightly. Come onto the balls of the feet and slowly start to stretch your legs as you lift your hips upwards. As with the previous exercise, start working an active push from the shoulder blades through the arms (Fig. 7).

Exhale and sink between the shoulder blades as you draw the shoulder blades down away from the ears and towards the pelvis (Fig. 8).

Over time you can sink and hover and combine the movement with a rotation of the shoulder blades. Your body's resistance puts a lot of strain on the muscles of the shoulder girdle.
Caution: Just as in the previous exercise, this is a great way to establish a stable connection to the shoulder blade, which is necessary in any overhead arm position. Practicing this with healthy shoulders will help you to do a number of yoga postures in a safe way and prevent possible injuries. If your shoulders are healing from any injury, however, this exercise will be simply too demanding.
Option: A less demanding option is practicing this in an upright seat with the arms stretched to the sky.
Effect: This particular muscular activation of the shoulder blade at this angle is necessary for downward dog, forearm stand and hand stand. The head of the humerus finds a balanced floating tension within the socket. This is an excellent preparation exercises to build up to the complete expression of these poses in a safe way.
Prone shoulder joint rotation with cactus arms
The starting position for the next exercises is also prone. Extend your arms to the sides and bend your elbows to 90 degrees. The hands face each other and the fingers are pointing forward. Leave your forehead on the floor as you lift the arms up away from the floor.

As you inhale, rotate the upper arm backwards in order to gently lift the fingers from the ground. The movement should originate from the humerus rotating in the shoulder joint, not the elbows or hands. The elbows remain hovering at the same point above the ground during the entire exercise (Fig.9).

As you exhale, rotate the upper arm downwards until the fingertips gently touch the floor (Fig. 10).
Repeat this rather small and controlled movement until the muscles of the rotator cuff are activated and challenged.
Caution: As with the other prone shoulder joint rotation exercise, be aware that this exercise puts a heavy load on the rotator cuff. For a healthy shoulder, this exercise will help tp build more stability and resilience. It is not the ideal exercises for anyone who is healing from a shoulder joint injury.
Option: To reduce the demand of this exercise, you can try it out in an upright seated postion. The arms will be lifted horizontally to the sides with the forearms and hands pointing upward, just like a cactus.
Effect: The rotator cuff muscles can be addressed and strengthened quite effectively when the arms are extended to the sides. This stability is useful for many daily activities, and for very common yoga postures such as triangle pose or warrior B.
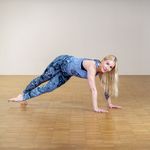
Shoulder blade rotation in side plank
In order to activate the myofascial features along the side of the arm which travels across the shoulder blade, we will now move into side plank. You can start from all fours and then shift your weight onto one hand as you straighten your legs to the side. Raise your upper arm upwards to your side and stabilize your core.
Using your bodyweight you will begin to push the floor away and sink into the floor from the shoulder blade outwards. Inhale to push away (Fig. 11).

Exhale to slowly sink down. Your arm and torso remain stable during this movement. The movement originates from the shoulder blade (Fig. 12).

Gradually over time this hovering and sinking can turn into circular movements. Check that your movement is coming from the shoulder blade and not just raising and lowering the pelvis.
Caution: As with the rest of this exercise sequence, these are exercises specifically intended for people with healthy shoulders who want to build more floating tension in the shoulder, especially those with the aim of working on more demanding postures such as arm balances. If you are healing from a shoulder injury, these are not recommended exercises for you as they can be too challenging and may set your recovery back due to their intensity.
Option: From the side plank on the knees, you can stretch one leg out long and stabilize with the lower bent knee. Or, as in the photos you can extend both legs out and balance on the outer edge of the bottom foot. To work more gently than on the knees in side plank, you could work leaning against a wall where you can control the angle a little better. As you can see, there are a number of options. Try to find one where you can work the shoulder specifically at the right intensity.
Effect: The M. Serratus Anterior pulls from the underside of the shoulder blade into the flank of the body. Moving the arm in a sideways position activates this muscle particularly well. This is a key muscle in creating floating tension in the shoulder blade.
Shoulder joint rotation in L-seat


The last part of this exercise sequence we will work on floating tension with the arms pushing downwards and parallel to the torso.
Come into an upright L-seat. Place your palms on the floor next to your thighs. Inhale and rotate the humerus outwards in the shoulder joint (Fig. 13).
Exhale and rotate the arms inwards again until the fingers point inwards as far as possible toward the thighs (Fig. 14).
Repeat until you can sense the activation and work of the rotator cuff at this angle.
Option: The more weight you put on your hands, the more resistance your rotator cuff will have to take. Start with less strain and work on building pressure slowly. If you start light, you are building up strength no matter how weak or strong your shoulders may be.
Effect: If you want to lift up for your Vinyasa, you need to harness control and stability in the rotator cuff. First we place the hands down before anything else and this is the basis for the entire movement. This exercise will help you to increase the floating tension in the shoulders which will help you to in turn generate more power to work towards this movement.
Shoulder blade rotation in L-Seat

Exhale lowering until your pelvis hovers just above the ground (Fig. 16).

Option: Depending on your proportions, strength and flexibility, you can also lift up with your hands directly on the floor. If you are healing from an injury, you can do this in standing pressing downward against the air with the arms close to the body. This way you can gently build mobility and strength before adding weight.
Effect: The most important muscles for the various lifts and Vinyasa found in Ashtanga Vinyasa are actually those found in the shoulder blades. The serratus anterior muscle pushes the shoulder blade long and lifts the body off of the floor. With this exercise you can come closer to achieving these movements. Regardless of if the goal is acrobatic movement or not, the serratus anterior muscle is one of the most important muscles for maintaining a healthy shoulder joint.
Have fun practicing!
Teacher: Dr. Ronald Steiner
Yogini: Melanie Pilz
Photographer: Paul Königer - www.yogafotograf.de
Apparel: OGNX

Messages and ratings
-

Hallo ihr beiden, Bild 3 und 4 unterscheiden sich nicht. Könnt ihr eins ändern oder seh nur ich den Unterschied nicht? Hallo ihr beiden, Bild 3 und 4 unterscheiden sich nicht. Könnt ihr eins ändern oder seh nur ich den Unterschied nicht?
-

Hallo Steffi,
wau. Vielen Dank für Deinen Hinweis. Ich habe es gleich korrigiert.
Namaste und herzliche Grüße
Ronald Hallo Steffi,
wau. Vielen Dank für Deinen Hinweis. Ich habe es gleich korrigiert.
Namaste und herzliche Grüße
Ronald
-