 Dr. Ronald Steiner
Like a vast network
The fibers of our fascial system permeates the entire body. They give cells their stability, connect them with one another and transmit mechanical stimuli. The network is woven so tightly that when hollow they depicts the shape of each organ or tissue. Fascia accounts for 20-25% of our total body weight.
If we removed our cells, fluids and minerals and left nothing more that the fascial system, we would actually look pretty much the same as we do now. The function of the cells would be missing, but their shape would remain. The same goes for our bones which are also covered and permeated with fascia. If the bones were not there, the shape would be the same, only the structural strength would be missing. We would be more or less a squishy toy version of ourselves.


 Dr. Ronald Steiner
More lively that it seems
The fascial network is by no means passive, which perhaps at first glance it might seem to be. Connective tissue cells (fibroblasts) react to mechanical stress. They react by releasing molecular building blocks (collagen fibers).
These collagen fibers carry a mild electrical charge. The mechanical stress itself creates a low electrical potential. In this way, the collagen fibers of the extracellular matrix adhere to one another following the direction of the load.
According to the direction of the load, more defined fascial trains are formed. They distribute the load across the entire network.
The fascial front line
A main fascial line is found running along the front of the body. Starting at the back of the foot, this line travels up over the m. tibialis anterior, over the knee cap (parapattellar fibers) and upward along the M. rectus femoris of the upper thigh.
The pelvis works as a lever. Force that is present at the ASIS (Spina Iliaca Anterior Superior) is transferred via the pelvis to the front of the public bone (Os pubis).
From there, the fascia continues upward through the rectus abdominus. The fascia goes straight up to the the sternum, here in the form of sternal fascia that is a rudimentary muscles in humans (M. sternalis).
This course of fibers continue further into the neck. Here, the line splits and pull left and right to the mastoid process at the back of the head. The fascia runs along the sternocleidomastoids. The head stretches forwards between these two branches of muscle fibers.
Double up at the hip - the deep front line
The hip is a very interesting part of the fascial picture. There is not only the front line pulling upwards along the body, but also a deep layer. This includes the iliopsoas and the iliofemoral ligament.
The continuation of this line can be found upwards at the front of the spine. The quadratus lumborum (QL) and the tendinous cruses of the diaphragm flow deep into the interior of the body. The doubling of the frontal fascia of the hip is part of the deep opposing double helix of the breath (see: Dorsal Helical Tension).
This doubling up phenomenon of the hip continues downward as well as the lines travel away from the front of the body. The adductors (M. Pectineus, M. Addutor Brevis, M. Adductor Longus) draw the fascial line deep within the leg. From there these lines wrap around the leg as part of another fascial opposing double helix system (see: Helical tension of the leg).
What do we want to stretch?
In order to develop our flexibility in backbends, there are two particularly interesting aspects:
Stretching the front of the hip
On one hand, we should develop flexibility via the hip joint because there are two fascial lines at the front. Because of this, flexibility is particularly limited. Exercises that place special focus on the front of the hip are very useful in developing your backbend practice.
Deep fascia line - centering the stretch
On the other hand, we should integrate the full on both the fascial lines to bring tension on the deeper line as well. Thus, we will focus the stretch at the front of the hip. The iliofemoral ligament is one of the hardest ligaments in the human body. This requires time and patience to bring more flexibility here.
Superficial line - distribute the stretch
The more superficial line, however, runs along the entire length of the front body. If we can distribute the tension evenly across this line, you are able to comfortable go deeper into your backbend because you are able to create space.

Exercise sequence
Here we will systematically practice back bending. In each exercise there are two variants. The first will center the stretch at the front of the hip joint, and the next will distribute it across the entire length of the superficial front line.
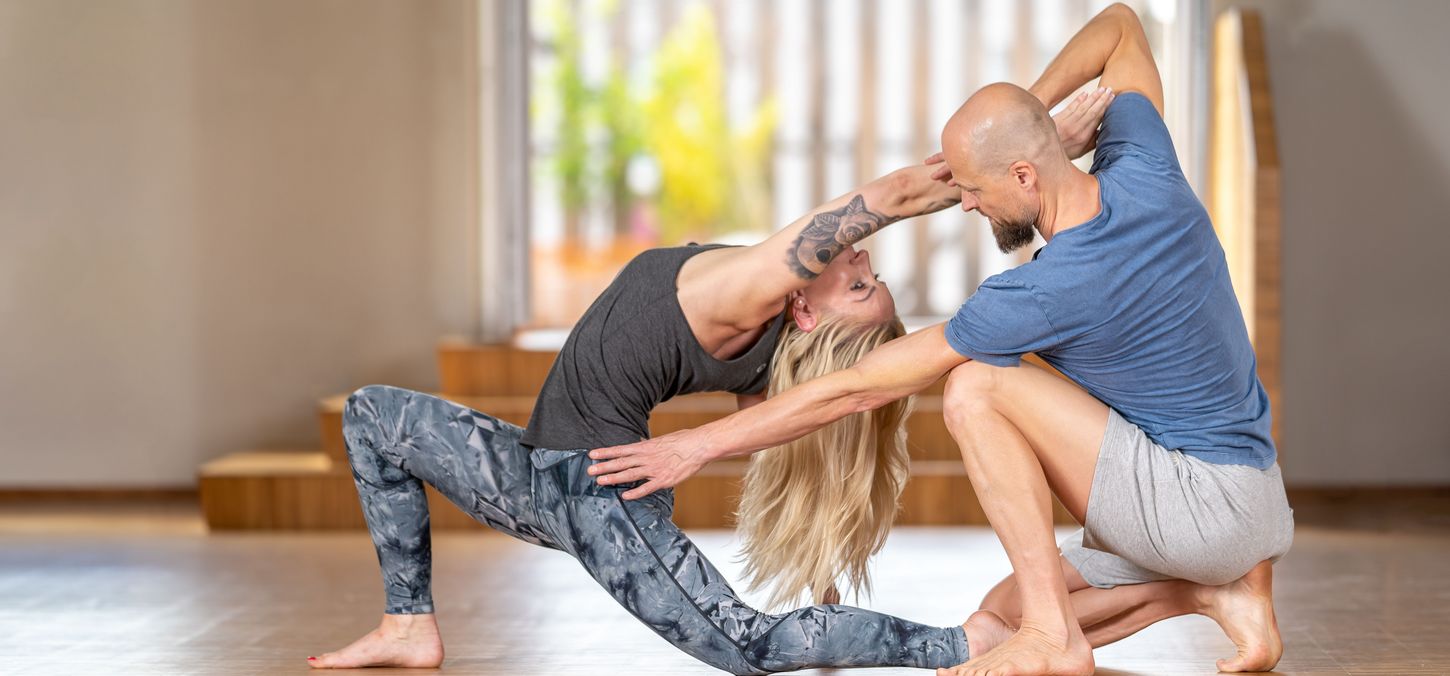
Anjaneyneasana – Stretch the front of the hip (deep front line)
Starting on all fours with your feet flexed, bring your right foot forward next to your right hand, then raise the torso up. The left foot remains flexed (ball of the foot on the ground). This is a simple deep lunge, also known as Anjaneyasana in yoga.

In this variant, the stretch is focused on the front of the hip. By staying on the ball of the foot and lowering the chin, you minimize the tension along the superficial line.
Place your right hand on the right knee and the left hand at the base of the left sitting bone. Draw the right knee forward as you lift, and use your left hand to push your pelvis forward from behind (Fig. 1).

In this way you can feel a stretch directly at the front of the hip. Enjoy the stretch for about five breaths before switching sides.
Effect: This exercise specifically stretches the deep front line at the hip joint. The iliopsoas and iliofemoral tendon (hip flexors) are stretched particularly well here.
Anjaneyneasana – Stretch across the entire front body (superficial front line)
Now we will go back into the same deep lunge pose, but we will point the foot, meaning that the top of the foot and as much of the shin as possible will be placed on the floor. This alone brings tension across the entire superficial front line.

Now, lift your arms up and back as your torso leans into a backbend. Here you will feel the line of pull across the entire front body. Here there is only a moderate line of pull at the hip flexor itself (Fig. 2).

Stay here for a few calm breaths before switching to the second side.
Effect: This stretch is distributed across the entire superficial front line. This will help you to develop more overall flexibility and create more space for back bending.
Ustrasana - Stretch the front of the hip (deep front line)
The same principle can be used with Camel pose, also known as Ustrasana, which is a backbend in knee stand.
Start in knee stand with your feet flexed. To get the most focused stretch at the hip flexor, bring your chin toward your sternum and stand on the balls of the feet.
Now place two fists at either side of the sacrum from the back and push your pelvis forward. Stay here for five to ten calm breaths and enjoy the stretch (Fig. 3).

Effect: After the previous one-sided stretch, the body is now ready to stretch both sides simultaneously. This version is used to created a focused stretch at the front of the hip joint.
Ustrasana - Stretch across the entire front body (superficial front line)
To modify the pose with the goal of stretching the entire front body you just need to make a few changes.
Point your feet, which means that you will place the tops of the feet down. The superficial front line pulls over the ankle and this change itself brings tension to the low point of this line.
Grab the tops of the thighs just below the buttocks and push them forwards as you start to rotate the legs inwards (deepening the groin). This will reduce tension on the deep front line.
Lift your sternum to the sky and create space in the upper chest until you can comfortably let your head hang backwards. Enjoy this expansive line of pull for another five to ten calm breaths (Fig. 4).

Effect: After the previously described exercise which targeted the tougher to stretch portion of the deep front line, this version which distributes the tension across the superficial front line acts more like a release. The entire front body experiences this line of pull, allowing you to sick further into the posture.
Upward facing bow - Stretch the front of the hip (deep front line)
We can take these principles even further to a deeper backbend. In this case, we are working up to Urdhva Dhanurasana, or Upward Facing bow.
Start supine on the floor. Place your feet close to the hips and bend your elbows so that the forearms point vertically upwards with the palms facing toward the mid-line of the body.
To focus the stretch at the hip flexor for the deep front line, press your heels and lumbar spine actively into the ground. Draw your stomach inward (Fig. 5).

Starting at the sacrum, roll vertebra by vertebra upwards to come into the smaller version of this backbend (Fig. 6).

If you want to go deeper into the backbend, place your hands next to your ears. Lift the sacrum up and push through the arms. Even in this full expression, we are working toward a deliberate stretch at the front of the hip (Fig. 7).

Effect: These versions of Urdhva Dhanurasana maintains length in the lumbar spine. Especially if you are more flexible, you will cultivate more stability in this version of the pose. The spinal processes of the lumbar region are then able to keep their distance.
Upward facing bow – Stretch across the entire front body (superficial front line)
The exact opposite is the case when you wish to distribute the stretch across the entire front body. Starting from the ground again you tilt your pelvis forward and draw the shoulder blades down toward the pelvis. You widen the space between the sitting bones and SI joint to expand further into this backend. The deliberate anterior tilt of the pelvis will reduce the immediate pull on the deep front line (Fig. 8).
Come onto the balls of the feet. This will bring the line of pull onto the superficial front line. Now lift your back altogether further away from the ground (you are already in a backbend before lifting). Stay here and enjoy the intense stretch. Pay close attention to how the line of pull differs from the first version, and feel how it spans across the entire front body (Fig. 9).
Take it to the next level by placing your hands next to your ears with the hands turned out sideways. Straighten the arms and lift into the pose, all the while creating space and height at the sternum. Enjoy for five to ten breaths (Fig. 10).
Effect: Less flexible people can benefit from this version because it allows for flexibility to be cultivated along the entire front line. The line of pull at the deep front line is reduced and switched out for the the superficial front line, which allows the practitioner to work on the overall flexibility across the front body.
Enjoy experimenting with these options!
Teacher: Dr. Ronald Steiner
Yogini: Melanie Pilz
Photographer: Paul Königer - yogafotograf.de
Apparel: OGNX

-

Heidi Fellensiek
at 16.07.2023 -

Margarete Langmann
at 25.04.2020danke! zum ersten mal ohne unterstützende klötze an der wand in das große rad gekommen. quasi wie von allein und mitten im raum. sehr schöne variante, die ich so noch nicht kannte. du schreibst die [...] danke! zum ersten mal ohne unterstützende klötze an der wand in das große rad gekommen. quasi wie von allein und mitten im raum. sehr schöne variante, die ich so noch nicht kannte. du schreibst die hände rechtwinklig aufsetzen zur seite, das bild zeigt sie jedoch mit den fingern zu den füßen. oder habe ich was falsch verstanden? ich habs jedenfalls so gemacht wie auf dem bild :-)
-

Hallo Margarete,
in der Tat auf den Bildern zeigen die Finger eher zu den Füßen. Noch mehr Effekt die Weite zu erzeugen hast Du mit den Fingern rechtwinklig zur Seite Probiere es einfach mal aus.
[...] Hallo Margarete,
in der Tat auf den Bildern zeigen die Finger eher zu den Füßen. Noch mehr Effekt die Weite zu erzeugen hast Du mit den Fingern rechtwinklig zur Seite Probiere es einfach mal aus.
Viel Freude wünscht Dir
Ronald
-
-

Sabin Wesarg
at 08.03.2020Toll, ich möchte bitte ein Buch mit Widmung vorbestellen und bedanke mich im Voraus für eure Erinnerung, wenn es bestellt werden kann :-)
Liebe Grüße von Hamburg nach Ulm Toll, ich möchte bitte ein Buch mit Widmung vorbestellen und bedanke mich im Voraus für eure Erinnerung, wenn es bestellt werden kann :-)
Liebe Grüße von Hamburg nach Ulm-
wau cool. Du kannst den neuen Yoga Doc nun vorbestellen:
https://de.ashtangayoga.info/shop/buecher-cds/buch/200414-der-yoga-doc-beweglich-und-schmerzfrei-mit-faszien-yoga/ wau cool. Du kannst den neuen Yoga Doc nun vorbestellen:
https://de.ashtangayoga.info/shop/buecher-cds/buch/200414-der-yoga-doc-beweglich-und-schmerzfrei-mit-faszien-yoga/
-
Messages and ratings